Submit HTML Form Data to Google Sheets Using JavaScript and AppScript Tutorial
How to Submit HTML Form Data to Google Sheets | Save Using doPost Method | AppScript | JavaScript.
This code allows you to create a simple HTML form and then submit the form data to a Google Sheet using Google Apps Script.
The HTML form has three input fields for the user to enter their name, email and phone number, and a submit button. When the user clicks the submit button, an event listener on the form captures the form data and sends it to a specified API endpoint URL via the fetch() method.
In the Google Apps Script code, we create a Spreadsheet object and open a specific sheet within that spreadsheet using the URL and sheet name. We define the doPost() function, which is triggered when the form data is sent to the API endpoint. The function retrieves the form data using e.parameter, which contains an object of key-value pairs for each form field. We then append the form data as a new row to the Google Sheet using the appendRow() method, and return a success message to the user.
To use this code, you need to replace the "Paste your spreadsheet url here" string with the URL of your Google Sheet, and the "Sheet1" string with the name of the sheet where you want to store the form data. You also need to deploy the Google Apps Script as a web app and get the API endpoint URL to use in the HTML code.
Follow the Steps
- First open Vs Code or any your favourite code editor and create a index.html file.
-
Paste the below code in the index.html.
<!DOCTYPE html> <!-- The doctype declaration tells the browser the version of HTML that the document is written in. --> <html lang="en"> <!-- The <html> element is the root element of an HTML page, and indicates that the page is written in HTML. --> <head> <meta charset="UTF-8"> <!-- The <meta> element provides metadata about the HTML document, such as character encoding. --> <meta http-equiv="X-UA-Compatible" content="IE=edge"> <!-- This meta tag tells Internet Explorer to use the latest version of the rendering engine. --> <meta name="viewport" content="width=device-width, initial-scale=1.0"> <!-- The viewport meta tag specifies how the website should be scaled on different devices. --> <title>HTML form to Google Sheet</title> <!-- The title element defines the title of the document, which is displayed in the browser's title bar. --> </head> <body> <h1 id="msg"></h1> <!-- The <h1> element defines a heading. The id attribute creates a unique identifier for the element. --> <form> <input type="text" name="name" placeholder='Name'><br><br> <!-- The <input> element is a form control element that allows the user to input data. --> <input type="email" name="email" placeholder='Email'><br><br> <input type="tel" name="phone" placeholder='Phone'><br><br> <input type="submit" id="sub"> <!-- The <input type="submit"> element creates a submit button. The id attribute creates a unique identifier for the element. --> </form> <script> let form = document.querySelector("form"); // The document.querySelector() method returns the first element that matches a specified CSS selector. form.addEventListener('submit', (e) => { e.preventDefault(); // The preventDefault() method stops the form from submitting and prevents the page from refreshing. document.querySelector("#sub").value = "Submiting.."; // Change the value of the submit button to "Submitting..." while the form is being submitted. let data = new FormData(form); // The FormData() method creates a new FormData object that contains the values of all the form fields. fetch('Paste_Your_Api_EndPoint_Url', { method: "POST", body: data }) // The fetch() method is used to make a request to the server and retrieve data. // This is an example API endpoint. Replace it with the actual URL for the API endpoint you want to use. .then(res => res.text()) // The .then() method is used to handle the response from the server. // The response is converted to text using the res.text() method. .then(data => { document.querySelector("#msg").innerHTML = data; // The innerHTML property sets or returns the HTML content of an element. // Here, we are setting the content of the <h1> element to the response from the server. document.querySelector("#sub").value = "Submit" // Change the value of the submit button back to "Submit" after the form has been submitted. }); }) </script> </body> </html> -
Now goto https://google.com/sheets and create a blank spreadsheet.
-
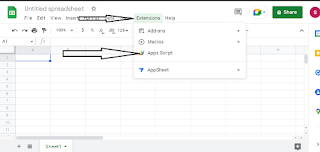
Click on extensions then click on Apps Script.
-
A new AppScript project will be open in new tab. Paste the below code there and go back to spreadsheet tab then copy url of spreadsheet then give the URL in argument of SpreadsheetApp.openByUrl() method in the code.
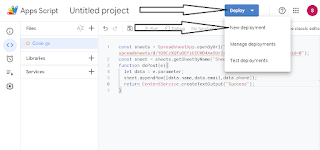
const sheets = SpreadsheetApp.openByUrl("Paste your spreadsheet url here"); // The SpreadsheetApp.openByUrl() method opens a Google Sheet using its URL and returns a Spreadsheet object. // Here, we are storing the Spreadsheet object in the sheets variable. //if you have changed your sheet name then replace the below Sheet1 with your sheet name // This comment is a reminder to replace "Sheet1" with the actual name of the sheet you want to use. const sheet = sheets.getSheetByName("Sheet1"); // The getSheetByName() method returns a sheet object with the given name from the Spreadsheet object. // Here, we are storing the sheet object in the sheet variable. function doPost(e){ // The doPost() function is a special function that is triggered when a HTTP POST request is made to the web app. // The function takes a request object as its parameter. let data = e.parameter; // The parameter property of the request object contains an object of key-value pairs representing the form data. // Here, we are storing the form data in the data variable. sheet.appendRow([data.name,data.email,data.phone]); // The appendRow() method adds a row to the sheet with the given values. // Here, we are adding a row to the sheet with the name, email, and phone values from the form data. return ContentService.createTextOutput("Success"); // The ContentService.createTextOutput() method creates a text output object that can be returned to the client. // Here, we are returning a "Success" message to the client. } - Click Deploy then click on New deployments.
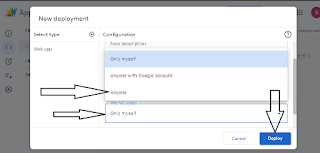
- Select type "Web App".
- In configuration section input your description and select "Anyone" in "who has access" dropdown menu then click on deploy.
- Click the Authorize Access Button.
- Select your Google account then you will see something like below image, click on "advanced" and click on "Go to Untitled project (unsafe)" then allow your Google account to access the project.
- You will get a API end point URL there Copy the URL then goto to your code editor and give the URL to argument of fetch() method. You are Done!.
Video Description
Code : https://b.codewithsundeep.com/2022/05/html-form-to-google-sheet.html
In this tutorial, we will show you how to submit HTML form data to Google Sheets using JavaScript and the doPost method in AppScript. If you're looking for a way to save form data in Google Sheets, this video is for you!
We will start by giving you an overview of the project and its features. Then, we will dive straight into the coding part. You will learn how to use JavaScript to capture form data, send it to AppScript, and save it to a Google Sheet.
We will guide you through the process of building the HTML form, setting up AppScript, and handling form submission using the doPost method. We will also explore some advanced features of JavaScript, such as Working with Google Sheets, to make the submission even more efficient and effective.
By the end of this tutorial, you will have a fully functional HTML form that submits data to Google Sheets using JavaScript and AppScript. You will also have a solid understanding of how to use JavaScript to handle form submission and save data to Google Sheets.
Whether you are a beginner or an experienced developer, this video is perfect for anyone looking to learn more about form submission using JavaScript and AppScript.
So, let's dive into the exciting world of JavaScript web development and learn how to submit HTML form data to Google Sheets using JavaScript and AppScript!
Queries :
- Submit HTML Form Data to Google Sheets using JavaScript
- Save data to Google Sheets with doPost method
- Using AppScript to handle form submission
- Capturing HTML form data with JavaScript
- Working with Google Sheets in JavaScript
- Building HTML form with HTML and CSS
- Saving data to Google Sheets with JavaScript
- Beginner's guide to form submission using JavaScript and AppScript
- How to submit HTML form data to Google Sheets using JavaScript
- JavaScript AppScript tutorial
Related videos :
- Fetch and Read Excel Sheets Data in HTML Table with JavaScript | Excel to HTML | JS | (Hindi) https://www.youtube.com/watch?v=LEqxxLVTfA4
- Fetch and Display Multiple CSV Files in HTML Table with JavaScript | CSV to HTML | Read CSV | -Hindi https://www.youtube.com/watch?v=nOpFRp9qYEk


