
Reputation: 24316
How can I create tests in Android Studio?
Just downloaded Android Studio which is based off of the Intellij Idea.
How would one create tests?
I notice there is a option for create a Test Module but this doesn't seem to do anything, only create a new project with src
I also tried pressing the hot key CTRL+AlT+T which allows to create unit tests on an existing class but it seems to want to place it in the current project. Of course this doesn't help with TDD
Does anyone have any experience here ?
Upvotes: 120
Views: 122056
Answers (12)

Reputation: 10200
I think this post by Rex St John is very useful for unit testing with android studio.

(source: rexstjohn.com)
Upvotes: 12

Reputation: 518
Android Studio v.2.3.3
Highlight the code context you want to test, and use the hotkey: CTRL+SHIFT+T
Use the dialog interface to complete your setup.
The testing framework is supposed to mirror your project package layout for best results, but you can manually create custom tests, provided you have the correct directory and build settings.
Upvotes: 12

Reputation: 512576
This answer is for people who are just getting started with Android testing. I will provide two simple examples to help you see how testing works. If you follow along for the next 10 minutes, you will be all set up to start adding your tests to your own app. I think you'll be surprised how easy it is. I certainly was.
Intro to Android Testing
There are two different types of tests that you will do.
- Local unit tests. These are run locally on the JVM (Java Virtual Machine). Since they are local, they are fast. You can use them to test the parts of your code that just need Java and not the Android APIs. (Sometimes you can make a fake API object to test more things locally. This is called a mocking. A mock
Contextis an example.) - Instrumented tests. These tests are run on a real device or in the emulator. That makes them slower than the local tests. However, they are more flexible because you have the full Android API available to you.
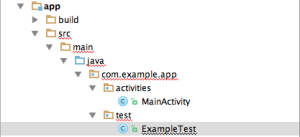
Create a new project and you will see the following default folders.

Everything is already there and waiting for you to create your tests. It's all set up already!
How to create local unit tests
Open the ExampleUnitTest file shown in the image above. it should look something like this:
public class ExampleUnitTest {
    @Test
    public void addition_isCorrect() throws Exception {
        assertEquals(4, 2 + 2);
    }
}
Press the double green arrow to run all the tests or the single green arrow to run only one. (In this case there is only one test so they both do the same thing.)

It should pass (as long as 2 + 2 is still 4 when you are reading this answer). Congratulations, you just ran your first test!
Making your own test
Let's write our own test. First add this class to your main app project so that we have something to test:
public class MyClass {
    public int add(int a, int b) {
        return a + b;
    }
}
Now change the addition_isCorrect() method in the test class to be like the following code (or just add another method with a different name):
public class ExampleUnitTest {
    @Test
    public void addition_isCorrect() throws Exception {
        MyClass myClass = new MyClass();
        int result = myClass.add(2, 2);
        int expected = 4;
        assertEquals(expected, result);
    }
}
Run it again and you should see it pass. Congratulations, you just created your own first test! (Well, I guess technically it was mine, but, hey, close enough. What's mine is yours.)
How to create instrumented tests
Open the ExampleInstrumentedTest file. it should look something like this:
@RunWith(AndroidJUnit4.class)
public class ExampleInstrumentedTest {
    @Test
    public void useAppContext() throws Exception {
        // Context of the app under test.
        Context appContext = InstrumentationRegistry.getTargetContext();

        assertEquals("com.example.myapp", appContext.getPackageName());
    }
}
Press one of those green buttons again.

As long as you have a real device connected or the emulator set up, it should have started it up and run your app. Congratulations, you just ran your first instrumented test!
Making your own test
The instrumented tests use Espresso to run the tests. It is kind of like your own little robot user that you can have test your app. You can tell it to do something like pressing a button or reading the properties of a TextView.
You can write the instructions for how to do the test by hand, but since we are just starting out, let's use the auto-record function. It's super simple.
First add a button to your UI so that we have something to work with. I did this:
<?xml version="1.0" encoding="utf-8"?>
<android.support.constraint.ConstraintLayout
    xmlns:android="http://schemas.android.com/apk/res/android"
    xmlns:tools="http://schemas.android.com/tools"
    android:layout_width="match_parent"
    android:layout_height="match_parent"
    tools:context="com.example.myapp.MainActivity">

    <Button
        android:id="@+id/myButton"
        android:text="Click me"
        android:layout_width="wrap_content"
        android:layout_height="wrap_content"/>

</android.support.constraint.ConstraintLayout>
Then press Run > Record Espresso Test in the menu.

After it starts, click the button in the emulator and then to finish choose OK on the Record dialog. It should auto generate the following test code.
@LargeTest
@RunWith(AndroidJUnit4.class)
public class MainActivityTest {

    @Rule
    public ActivityTestRule<MainActivity> mActivityTestRule = new ActivityTestRule<>(MainActivity.class);

    @Test
    public void mainActivityTest() {
        ViewInteraction appCompatButton = onView(
                allOf(withId(R.id.myButton), withText("Click me"), isDisplayed()));
        appCompatButton.perform(click());
    }
}
Great! You just created you first instrumented test! That was super easy. You should probably add an assertion to make it a real test, but that that is pretty easy to do with the recorder, too. Watch this video to go a little deeper.
Further Study
I'd watch the videos first and then read through the documentation. It is all pretty helpful. The last link is to a series of articles that cover some important things to think about when choosing what to test.
- Android Testing Patterns (short video series from Android Developers)
- Getting Started with Testing (Android docs)
- Three Steps to Code Quality via TDD
Upvotes: 65

Reputation: 69
Add below lib inside gradle file
 androidTestCompile('com.android.support.test.espresso:espresso-core:2.2.2', {
        exclude group: 'com.android.support', module: 'support-annotations'
    })
Create class HomeActivityTest inside androidTest directory and before running the test add flurry_api_key and sender_id string inside string resource file and change the value for failure and success case.
@RunWith(AndroidJUnit4.class)
public class HomeActivityTest
{
    private static final String SENDER_ID = "abc";
    private static final String RELEASE_FLURRY_API_KEY = "xyz";

    @Test
    public void gcmRegistrationId_isCorrect() throws Exception
    {
        // Context of the app under test.
        Context appContext = InstrumentationRegistry.getTargetContext();

        Assert.assertEquals(SENDER_ID, appContext.getString(R.string.sender_id));
    }

    @Test
    public void flurryApiKey_isCorrect() throws Exception
    {
        // Context of the app under test.
        Context appContext = InstrumentationRegistry.getTargetContext();

        Assert.assertEquals(RELEASE_FLURRY_API_KEY, appContext.getString(R.string.flurry_api_key));
    }
}
Upvotes: 0

Reputation: 4565
The easiest way I found is the streamlined in my following blog post:
- Create a folder in which you'll write all your unit tests (preferably com.example.app.tests)
- Create a new test class (preferably NameOfClassTestedTests, i.e BankAccountLoginActivityTests)
- Extend InstrumentationTestCase
- Write a failing unit test to make sure we succeeded configuring unit tests
- Note that a unit test method name must start with the word “test” (preferably testTestedMethodNameExpectedResult() i.e testBankAccountValidationFailedShouldLogout())
- Configure your project for unit tests:
- Open the 'Run...' menu and click 'edit configurations'
- Click the + button
- Select the Android Tests template
- Input a name for your run configuration (preferably 'AppName Tests')
- Select your app in the module combobox
- Select the “All In Package” radio button (generally you'd want to select this option because it runs all unit tests in all your test classes)
- Fill in the test package name from step 1 (i.e com.example.app.tests)
- Select the device you wish to run your tests on
- Apply and save the configuration
- Run unit tests (and expect failure):
- Select your newly created Tests configuration from the Run menu
- Click Run and read the results in the output console
Good luck making your code more readable, maintainable and well-tested!
Upvotes: 3

Reputation: 29877
Android Studio keeps evolving so the responses above will eventually be no longer applicable. For the current version of Android Studio 1.2.1.1, there's a nice tutorial on testing at:
http://evgenii.com/blog/testing-activity-in-android-studio-tutorial-part-1/
Upvotes: 4

Reputation: 5122
As of Android Studio 1.1, we've got official (experimental) support for writing Unit Tests (Roboelectric works as well).
Source: https://sites.google.com/a/android.com/tools/tech-docs/unit-testing-support
Upvotes: 2

Reputation: 2074
Android Studio has been kind of a moving target, first being a developer preview and now being in beta. The path for the Test classes in the project has changed during time, but no matter what version of AS you are using, the path is declared in your .iml file. Currently, with version 0.8.3, you'll find the following inside the inner iml file:
      <sourceFolder url="file://$MODULE_DIR$/src/androidTest/res" type="java-test-resource" />
  <sourceFolder url="file://$MODULE_DIR$/src/androidTest/resources" type="java-test-resource" />
  <sourceFolder url="file://$MODULE_DIR$/src/androidTest/assets" type="java-test-resource" />
  <sourceFolder url="file://$MODULE_DIR$/src/androidTest/aidl" isTestSource="true" />
  <sourceFolder url="file://$MODULE_DIR$/src/androidTest/java" isTestSource="true" />
  <sourceFolder url="file://$MODULE_DIR$/src/androidTest/groovy" isTestSource="true" />
  <sourceFolder url="file://$MODULE_DIR$/src/androidTest/jni" isTestSource="true" />
  <sourceFolder url="file://$MODULE_DIR$/src/androidTest/rs" isTestSource="true" />
The .iml file is telling you where to place your test classes.
Upvotes: 2

Reputation: 504
Edit: As of 0.1.8 this is now supported in the IDE. Please follow the instructions in there, instead of using the instructions below.
Following the Android Gradle Plugin User Guide I was able to get tests working on the command line by performing the following steps on a newly created project (I used the default 'com.example.myapplication' package):
- Add a src/instrumentTest/java directory for the tests
- Add a test class (extending ActivityTestCase) in the package com.example.myapplication.test
- Start a virtual device
- On the command line (in the MyApplicationProject/MyApplication directory) use the command '../gradlew connectedInstrumentTest'
This ran my tests and placed the test results in MyApplicationProject/MyApplication/build/reports/instrumentTests/connected. I'm new to testing Android apps, but it seem to work fine.
From within the IDE, it's possible to try and run the same test class. You'll need to
- Update build.gradle to list Maven Central as a repo
- Update build.gradle add JUnit 3.8 as a instrumentTestCompile dependency e.g. instrumentTestCompile 'junit:junit:3.8'
- In 'Project Structure' manually move JUnit to be first in the dependency order
However this fails (the classpath used when running the tests is missing the test output directory). However, I'm not sure that this would work regardless as it's my understanding that an Android specific test runner is required.
Upvotes: 36

Reputation: 504
I would suggest to use gradle.build file.
Add a src/androidTest/java directory for the tests (Like Chris starts to explain)
Open gradle.build file and specify there:
android {

    compileSdkVersion rootProject.compileSdkVersion
    buildToolsVersion rootProject.buildToolsVersion

    sourceSets {

        androidTest {
            java.srcDirs = ['androidTest/java']
        }
    }
}
Press "Sync Project with Gradle file" (at the top panel). You should see now a folder "java" (inside "androidTest") is a green color.
Now You are able to create there any test files and execute they.
Upvotes: 20

Reputation: 1561
As of now (studio 0.61) maintaining proper project structure is enough. No need to create separate test project as in eclipse (see below).

Upvotes: 7

Reputation: 795
One of the major changes it seems is that with Android Studio the test application is integrated into the application project.
I'm not sure if this helps your specific problem, but I found a guide on making tests with a Gradle project. Android Gradle user Guide
Upvotes: 3
Related Questions
- Android Studio Unit Testing
- Create unit tests in android studio
- How to run a JUnit Test in android studio?
- Unit testing in android studio
- How to run a test method or class as an Android Test in Android Studio
- Testing android app using Android Studio
- Android Studio with JUnit testing
- Unit tests in Android Studio 0.8
- How to create a test module to test an Android library in IntelliJ IDEA
- Set up Android testing in Intellij IDEA