
Reputation: 12003
Control spacing around custom text attributes in NSLayoutManager
I’ve got a custom NSLayoutManager subclass I’m using to draw pill-shaped tokens. I draw these tokens for substrings with a custom attribute (TokenAttribute). I can draw no problem.
However, I need to add a little bit of “padding” around the ranges with my TokenAttribute (so that the round rectangle background of the token won’t intersect with the text).

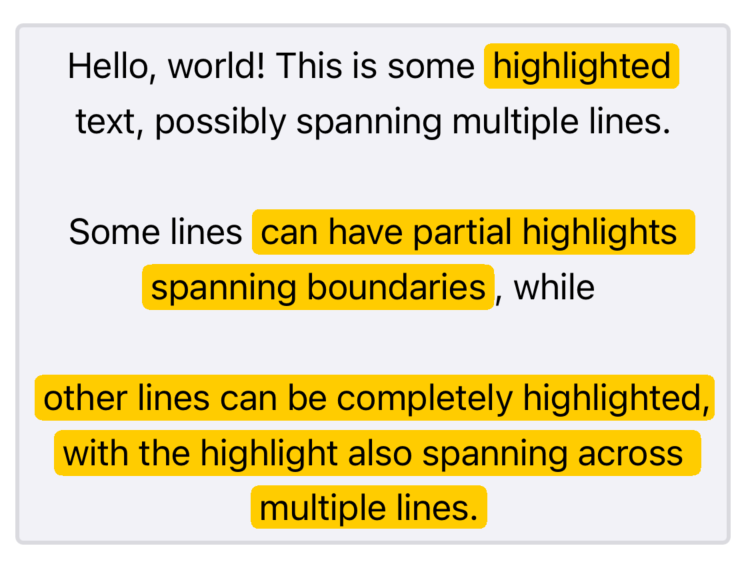
In the above image, I’m drawing my token’s background with an orange colour, but I want extra padding around 469 so the background isn’t right up against the text.
I’m not really sure how to do this. I tried overriding -boundingRectForGlyphRange:inTextContainer: to return a bounding rect with more horizontal padding, but it appears the layout of glyphs isn’t actually affected by this.
How do I give more spacing around certain glyphs / ranges of glyphs?
Here’s the code I use to draw the background, in my layout manager subclass:
- (void)drawGlyphsForGlyphRange:(NSRange)glyphsToShow atPoint:(CGPoint)origin {

    NSTextStorage *textStorage = self.textStorage;
    NSRange glyphRange = glyphsToShow;

    while (glyphRange.length > 0) {

        NSRange characterRange = [self characterRangeForGlyphRange:glyphRange actualGlyphRange:NULL];
        NSRange attributeCharacterRange;
        NSRange attributeGlyphRange;

        id attribute = [textStorage attribute:LAYScrubbableParameterAttributeName
                                      atIndex:characterRange.location
                        longestEffectiveRange:&attributeCharacterRange
                                      inRange:characterRange];

        attributeGlyphRange = [self glyphRangeForCharacterRange:attributeCharacterRange
                                           actualCharacterRange:NULL];
        attributeGlyphRange = NSIntersectionRange(attributeGlyphRange, glyphRange);

        if (attribute != nil) {
            CGContextRef context = UIGraphicsGetCurrentContext();
            CGContextSaveGState(context);

            UIColor *backgroundColor = [UIColor orangeColor];
            NSTextContainer *textContainer = self.textContainers[0];
            CGRect boundingRect = [self boundingRectForGlyphRange:attributeGlyphRange inTextContainer:textContainer];

            // Offset this bounding rect by the `origin` passed in above
            // `origin` is the origin of the text container!
            // if we don't do this, then bounding rect is incorrectly placed (too high, in my case).
            boundingRect.origin.x += origin.x;
            boundingRect.origin.y += origin.y;

            [backgroundColor setFill];
            UIBezierPath *path = [UIBezierPath bezierPathWithRoundedRect:boundingRect cornerRadius:boundingRect.size.height / 2.0];
            [path fill];

            [super drawGlyphsForGlyphRange:attributeGlyphRange atPoint:origin];
            CGContextRestoreGState(context);

        } else {
            [super drawGlyphsForGlyphRange:glyphsToShow atPoint:origin];
        }

        glyphRange.length = NSMaxRange(glyphRange) - NSMaxRange(attributeGlyphRange);
        glyphRange.location = NSMaxRange(attributeGlyphRange);
    }
}
Upvotes: 16
Views: 2251
Answers (2)

Reputation: 29928
Sample Code
This is a supplementary answer to @PeerBenderson's answer, intending to clarify/reify some of the details required to pull this off. I've put together some heavily-annoted sample code, showing how to create a control that looks like this based on a specific real-world use-case:
The gist of making this work:
- The above text displays inside of a non-interactive
UITextViewwith a text container that tracks its width and height, and a custom layout manager to control drawing backgrounds; I find it's easiest to overrideUITextViewto set this up - The custom layout manager is responsible for the heavy lifting. In calling order during a layout pass:
- By implementing the
layoutManager(_:shouldGenerateGlyphs:properties:characterIndexes:font:forGlyphRange:)delegate method, the layout manager has the opportunity to produce a series of glyphs for a given range of text; for ranges of text which have a background color applied, the layout manager inserts an empty glyph with the.controlCharacterproperty at the beginning and end of the range of text; it does so by "attaching" the glyph to the first and last characters already present in the range (e.g., as if it were an accent character) - For each of those inserted control characters (and all other control characters in the text!), implementing the
layoutManager(_:shouldUse:forControlCharacterAt:)delegate method allows the layout manager to select how the control character should be handled. The action provided by default for our custom control characters is.zeroAdvancement(i.e., "don't display this glyph"), and we turn that into.whitespaceto insert padding - Because we turn our control characters into
.whitespace, implementing thelayoutManager(_:boundingBoxForControlGlyphAt:for:proposedLineFragment:glyphPosition:characterIndex:)delegate method gives the layout manager the opportunity to give the inserted whitespace an actual bounding box; in the sample code, the size of this box is fixed to a constant, but in practice, it's possible to provide any amount of space desired - Overriding the
fillBackgroundRectArray(_:count:forCharacterRange:color:)method finally allows the layout manager to fill in ranges of background-colored text. The manager splits the given ranges into lines, and individually draws filled rounded rectangles for each line in the range. Because it's previously inserted whitespace at the beginning and end of each range of characters, the highlight can bleed into the extra space around these ranges, making use of the padding
- By implementing the
Caveats
- If your tokens can be placed at the very beginning or very end of a line, the approach as described here works best for centered text, rather than text that is flush left or right. This is because glyph generation comes before bounding boxes can be calculated for lines of text, which means that at the point where we have the opportunity to insert whitespace, we can't yet know where line breaks will be. At best, we can insert whitespace at the start and end of a highlighted range, but for ranges that span more than one line, the start of each new line won't have an extra control glyph inserted. Because of this, text is drawn flush to the edges of the text container, which means that backgrounds can only be drawn by bleeding into the margin. This may not be a problem for some use-cases, but for giving the appearance of a token being completely inline with text, this can somewhat break the illusion. Centering the text is more likely to pull it away from the edges of the text container, which alleviates this effect slightly
- Iterating over lines in
fillBackgroundRectArray(...)and filling them in individually assumes that there will be sufficient line spacing between lines for backgrounds to not overlap. For different visual styles (e.g., merging large "blobs" together), a different approach will be necessary in that method
Upvotes: 4

Reputation: 59
There are methods defined in NSLayoutManagerDelegate, that serve as glyph-based customisation points.
Use
func layoutManager(_ layoutManager: NSLayoutManager, shouldGenerateGlyphs glyphs: UnsafePointer<CGGlyph>, properties props: UnsafePointer<NSLayoutManager.GlyphProperty>, characterIndexes charIndexes: UnsafePointer<Int>, font aFont: NSFont, forGlyphRange glyphRange: NSRange) -> Int
to identify the glyphs associated with the whitespace surrounding your range-of-interest and mark those by altering their value in the props array to NSLayoutManager.GlyphProperty.controlCharacter. Then pass this altered array to
NSLayoutManager.setGlyphs(_:properties:characterIndexes:font:forGlyphRange:)
Afterwards, you may implement
func layoutManager(_ layoutManager: NSLayoutManager, shouldUse action: NSLayoutManager.ControlCharacterAction, forControlCharacterAt charIndex: Int) -> NSLayoutManager.ControlCharacterAction
to again identify the glyphs of interest and return the predefined action:
NSLayoutManager.ControlCharacterAction.whitespace
This, at the end, lets you implement
func layoutManager(_ layoutManager: NSLayoutManager, boundingBoxForControlGlyphAt glyphIndex: Int, for textContainer: NSTextContainer, proposedLineFragment proposedRect: NSRect, glyphPosition: NSPoint, characterIndex charIndex: Int) -> NSRect
to alter the bounding box used for the glyphs. Simply return the appropriated dimensions. This will have effect on the following layout-mechanism.
Good luck!
Upvotes: 5
Related Questions
- Spacing around NSTextAttachment
- Adjust letter spacing in iOS 7
- UITextView/UILabel with background but with spacing between lines
- Line Spacing for UILabel with a single line of text
- Adjusting the line spacing of UITextView
- iOS7 Type into UITextView with Line Spacing and keep formatting using TextKit
- How does line spacing work in Core Text? (and why is it different from NSLayoutManager?)
- line spacing NSTextView
- How to set padding in UIText view
- How to set the white space size in CoreText?