
Reputation: 6121
Drawing curved SVG arrow lines from div to div
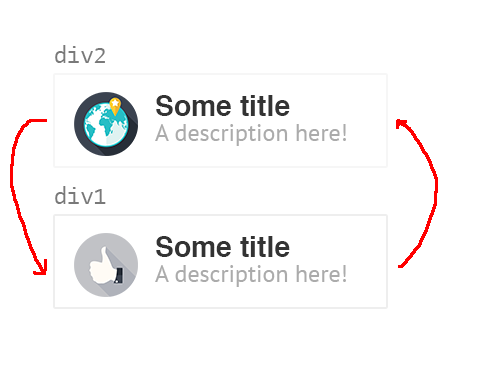
I want to draw two curved arrow lines using SVG to connect two elements to indicate they go back and forth, like this:
I've read a bit about SVG but I'm not totally sure how to create a line that's vertical.
Second, if SVG takes coordinates, do I have to find the coordinate position of the elements before creating the SVG drawing? Does it have to be re-drawn if the window size is adjusted?
Upvotes: 44
Views: 33515
Answers (3)
Reputation: 266
I found Andrew Willems's answer very useful. I've modified it to make a library, draw_arrow.js , which exports a function draw_arrow( sel1, locs1, sel2, locs2, arr ). This draws an arrow from the element identified by CSS selector sel1 to that identified by sel2. locs1 and locs2 indicate where the arrow should start or end on the element. arr identifies an SVG path to hold the arrow.
You can download this, and see two demos, from the links at the end of http://www.chromophilia.uk/posts/dress-reform-architecture-and-modernism.html. I needed the arrows to depict the relationships between various topics related to Modernism, as part of an animation. That's what drove me to find and adapt Andrew's code.
Here's a suggested improvement. I originally wrote this up as a new, additional, answer, but several commenters have execrated that, so I'll have to put it here and hope it gets noticed. I'm pursuing this because modularity is important. A routine such as draw_arrow should require its user to do as little as possible to the code around it. But at the moment, it needs the user to create one <path> element inside the <svg> for each arrow to be drawn, and to invent IDs for the paths. I suggest it would be better for draw_arrow to do this, by updating the DOM tree. Comments in favour or against?
Upvotes: 10

Reputation: 12458
Make an svg element that (invisibly) underlies the entire document. This will hold both arrows. Insert two svg path elements (the arrows) whose start and end coordinates are calculated based on the positions of the div's to be connected, and whose curve is created in whatever way you want based on those start and end coordinates.
For the example below, click on "Run code snippet". Then click and drag either of the div's to see how the arrows are dynamically created, i.e. they move with the divs. jQuery and jQueryUI are used in the code snippet simply to allow the easy draggability of the divs and have nothing to do with the creation and use of the arrows.
This example has two arrows starting and ending at the middle of the divs' sides. The details of the curve are, of course, up to you. The arrow lines are constructed using the d attribute of the svg path. In this example, "M" is the "moveTo" coordinates where the path will start and the "C" points are the first and second control points and final coordinate for a cubic bezier curve. You'll have to look those up to understand what they are, but they are a general way of creating smooth curves in an svg element. The arrowheads are added using an svg <marker> element which you can read about here.
A more complex document would need more care to determine the start and end coordinates of the svg path elements, i.e. the arrows, but this example at least gives you a place to begin.
Answers to your specific questions:
If SVG takes coordinates, do I have to find the coordinate position of the elements before creating the SVG drawing? Yes, as I've done in my code.
Does it have to be re-drawn if the window size is adjusted? Probably yes, depending on what happens to the divs themselves when the window is resized.
var divA       = document.querySelector("#a");
var divB       = document.querySelector("#b");
var arrowLeft  = document.querySelector("#arrowLeft");
var arrowRight = document.querySelector("#arrowRight");

var drawConnector = function() {
  var posnALeft = {
    x: divA.offsetLeft - 8,
    y: divA.offsetTop  + divA.offsetHeight / 2
  };
  var posnARight = {
    x: divA.offsetLeft + divA.offsetWidth + 8,
    y: divA.offsetTop  + divA.offsetHeight / 2
  };
  var posnBLeft = {
    x: divB.offsetLeft - 8,
    y: divB.offsetTop  + divB.offsetHeight / 2
  };
  var posnBRight = {
    x: divB.offsetLeft + divB.offsetWidth + 8,
    y: divB.offsetTop  + divB.offsetHeight / 2
  };
  var dStrLeft =
      "M" +
      (posnALeft.x      ) + "," + (posnALeft.y) + " " +
      "C" +
      (posnALeft.x - 100) + "," + (posnALeft.y) + " " +
      (posnBLeft.x - 100) + "," + (posnBLeft.y) + " " +
      (posnBLeft.x      ) + "," + (posnBLeft.y);
  arrowLeft.setAttribute("d", dStrLeft);
  var dStrRight =
      "M" +
      (posnBRight.x      ) + "," + (posnBRight.y) + " " +
      "C" +
      (posnBRight.x + 100) + "," + (posnBRight.y) + " " +
      (posnARight.x + 100) + "," + (posnARight.y) + " " +
      (posnARight.x      ) + "," + (posnARight.y);
  arrowRight.setAttribute("d", dStrRight);
};

$("#a, #b").draggable({
  drag: function(event, ui) {
    drawConnector();
  }
});

setTimeout(drawConnector, 250);
/* The setTimeout delay here is only required to prevent
 * the initial appearance of the arrows from being
 * incorrect due to the animated expansion of the
 * Stack Overflow code snippet results after clicking
 * "Run Code Snippet." If this was a simpler website,
 * a simple command, i.e. `drawConnector();` would suffice.
 */
html,
body {
width: 100%;
height: 100%;
padding: 0;
margin: 0;
}
#instructions {
position: fixed;
left: 50%;
}
#a, #b {
color: white;
text-align: center;
padding: 10px;
position: fixed;
width: 100px;
height: 20px;
left: 100px;
}
#a {
background-color: blue;
top: 20px;
}
#b {
background-color: red;
top: 150px;
}<p id="instructions">Click and drag either div to see automatic arrow adjustments.</p>
<script src="https://ajax.googleapis.com/ajax/libs/jquery/2.1.1/jquery.min.js"></script>
<script src="https://ajax.googleapis.com/ajax/libs/jqueryui/1.12.0/jquery-ui.min.js"></script>
<svg xmlns="http://www.w3.org/2000/svg" width="100%" height="100%">
<defs>
<marker id="arrowhead" viewBox="0 0 10 10" refX="3" refY="5"
markerWidth="6" markerHeight="6" orient="auto">
<path d="M 0 0 L 10 5 L 0 10 z" />
</marker>
</defs>
<g fill="none" stroke="black" stroke-width="2" marker-end="url(#arrowhead)">
<path id="arrowLeft"/>
<path id="arrowRight"/>
</g>
</svg>
<div id="a">Div 1</div>
<div id="b">Div 2</div>Upvotes: 167

Reputation: 4903
We finally have it! Take a look at this:
https://www.npmjs.com/package/arrows-svg
there is also a React version:
https://www.npmjs.com/package/react-arrows
So if you have two divs with let's say ids named: from and to according to divs from your example, then you do:
import arrowCreate, { DIRECTION } from 'arrows'

const arrow = arrowCreate({
  className: 'arrow',
  from: {
    direction: DIRECTION.LEFT,
    node: document.getElementById('from'),
    translation: [-0.5, -1],
  },
  to: {
    direction: DIRECTION.LEFT,
    node: document.getElementById('to'),
    translation: [0.9, 1],
  },
})

/*
  - arrow.node is HTMLElement
  - arrow.timer is idInterval from setInterval()
    REMEMBER about clearInterval(node.timer) after unmount
*/
document.body.appendChild(arrow.node);
and of course some css:
.arrow {
  pointer-events: none;
}

.arrow__path {
  stroke: #000;
  fill: transparent;
  stroke-dasharray: 4 2;
}

.arrow__head line {
  stroke: #000;
  stroke-width: 1px;
}
Tested and it works!
Upvotes: 9
Related Questions
- How to draw a curve by using div?
- How to draw an arrow in SVG?
- how to make svg curve at one end
- connecting divs with svg line
- Svg animation for curved path
- JS draw an arrow pointing from one div to another
- Connecting elements with curved lines on website
- Drawing a curved dashed line SVG on scroll
- Draw line with CSS
- How to draw a curved svg path