
Reputation: 451
Visual Studio Code: How to configure includePath for better IntelliSense results
I am a complete beginner to using Visual Studio Code and I have no clue what I am doing.
I've searched around (maybe not enough), but I can't find just a simple explanation for someone like me on how to configure the c_cpp_properties.json file that I am redirected to whenever I click on the yellow light bulb next to a line that is underlined with a green squiggle.
I just want to know what to put in the .json to make IntelliSense work properly.
Upvotes: 44
Views: 223828
Answers (4)

Reputation: 989
In 2023, Visual Studio Code's C/C++ extension has an UI for IntelliSense configuration. No need to edit the configuration in bare json.
You can open IntelliSense configuration UI through command palette: Type Ctrl + Shift + P and search for "Edit configurations".

I'd like to explain the configuration of an include path by way of example:
I have a project using an old cross compiler. The include files reside in C:\Program Files\Keil\C51\INC
IntelliSense knows nothing about the compilers include files. Thus I see include paths with red squiggly lines. When I click on the line I see the yellow light bulb. I click on the light bulb and a list of suggestions opens.

Clicking on Edit "compilerPath" setting opens IntelliSense configuration pane.
Scroll to "Include path" and add the include path in the text field.

Now the red squiggles are gone.

Upvotes: 2

Reputation: 4991
VSCode is very adept at asking the compiler what include paths it is using if you set things up correctly. Part of my project uses a DSP compiler based on GCC, so by adding "-v" to the compiler's flags (I put it in CFLAGS in my Makefile) I was able to see the internal command lines which revealed the "secret" flags being passed to the lower compiler levels. This showed me what "-D" values I needed to add to the "defines" section of my config and, more importantly, that "-isystem" was being used to set the system include directory. I ended up with this in my c_cpp_properties.json:-
{
    "configurations": [
    {
        "name": "CEVA-V15",
        "includePath": [
            "${workspaceFolder}/**"
        ],
        "defines": [
            "CEVAXC323",
            "XC323_CEVA"
        ],
        "compilerPath": "/devtools/CEVA-ToolBox/V15/CEVA-XC/cevaxccc",
        "cStandard": "gnu11",
        "cppStandard": "gnu++14",
        "intelliSenseMode": "linux-gcc-arm",
        "compilerArgs": [
            "-isystem /devtools/CEVA-ToolBox/V15/CEVA-XC/include"
        ]
    }
    ]
}
Upvotes: 1

Reputation: 2010
From the official documentation of the C/C++ extension:
Configuring includePath for better IntelliSense results
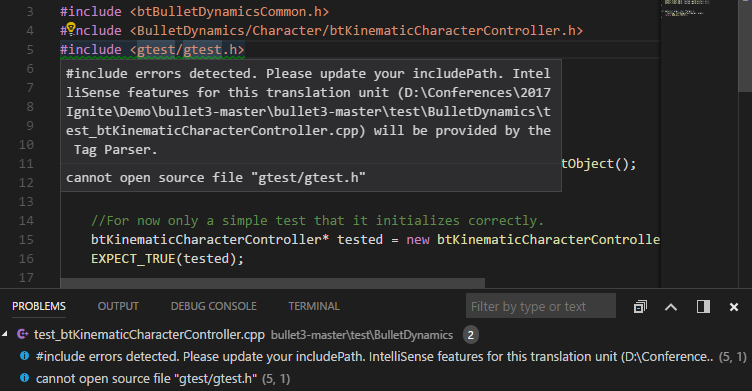
If you're seeing the following message when opening a folder in Visual Studio Code, it means the C++ IntelliSense engine needs additional information about the paths in which your include files are located.

Where are the include paths defined?
The include paths are defined in the "includePath" setting in a file called c_cpp_properties.json located in the .vscode directory in the opened folder.
You can create or open this file by either using the "C/Cpp: Edit Configurations" command in the command palette or by selecting "Edit "includePath" setting" in the light bulb menu (see the screenshot below). The quickest way to locate a light bulb is to scroll to the top of the source file and click on any green squiggle that shows up under a #include statement.

When a folder is opened, the extension attempts to locate your system headers based on your operating system, but it does not know about any other libraries that your project depends on. You can hover over the green squiggles or open the Problems window to understand which headers the IntelliSense engine is unable to open - sometimes it's the dependent headers that can't be located.
How can I specify the include paths?
You can specify the remaining paths using one of the techniques described below.
Use compile_commands.json file to supply includePaths and defines information
The extension can get the information for
"includePath"and"defines"from a compile_commands.json file, which can be auto-generated by many build systems such as CMake and Ninja. Look for the section where your current configuration is defined (by default there's one configuration per operating system, such as "Win32 or "Mac"), and set the"compileCommands"property in c_cpp_properties.json to the full path to your compile_commands.json file and the extension will use that instead of the"includes"and"defines"properties for IntelliSense.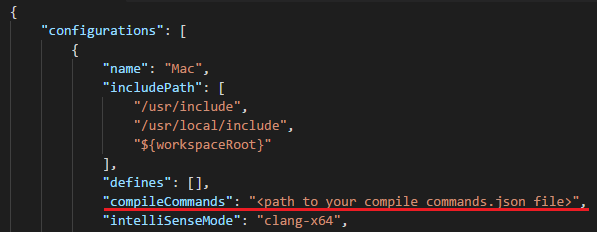
Use the light bulb suggestions to auto-resolve includePath
The first thing to try is to leverage the light bulb path suggestions to auto-resolve the include paths. When you open a folder, the extension will recursively search for potential include paths that match the header files your code is using based on the paths set by the
"browse.path"setting in c_cpp_properties.json. Click on the green squiggles under #include statements and you'll see a light bulb offering suggestions of paths that will allow IntelliSense to resolve the included file.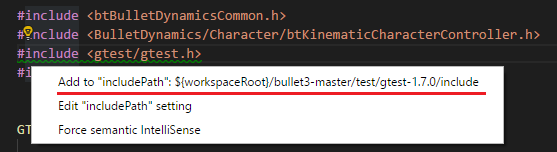
If you don't see path suggestions in the light bulb, try adding the root folder where the headers are likely located in to the
"browse.path"setting in c_cpp_properties.json. This allows the extension to recursively search in these folders and offer more suggestions in the light bulb as the search process goes on.Manually add include paths
If none of the above fully resolves the paths, you could manually specify the paths to the headers that your project depends on in the c_cpp_properties.json file. Look for the section where your current configuration is defined (by default there's one configuration per OS, such as "Win32 or "Mac"), and add your paths in the
"includePath"setting and defines in the"defines"setting. For example, the following screenshot shows a snippet of the file specifying path for the Mac configuration.Also, for MinGW, as the documentation of the extension explains you may ask gcc/g++ to list its own include files:
gcc -v -E -x c++ nul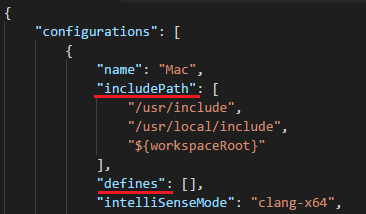
Verify the include paths are correctly resolved
There are two ways to verify that the include paths are correctly resolved:
- The green squiggles in the source file are no longer showing
- Error messages are cleared in the Problems window
This indicates that the IntelliSense engine has got the include paths resolved so you can start enjoying the full IntelliSense for your C or C++ code for the current translation unit. Note that you may still see errors on other files if they belong to a different translation unit that requires additional include paths to be configured.
If this didn't resolve your issue then, check out the configuration for MinGW below and try setting the appropriate location for your Cygwin installation for the respective/similar header files & folders.
c_cpp_properties.json reference guide
Upvotes: 37
Reputation: 53
From C/C++ for Visual Studio Code (Preview):
Below you can see that the MinGW C++ include path has been added to browse.path for Windows:
{
"name": "Win32",
"includePath": [
    "${workspaceRoot}"
],
"defines": [
    "_DEBUG",
    "UNICODE"
],
"intelliSenseMode": "msvc-x64",
"browse": {
    "path": [
        "${workspaceRoot}",
        "C:\\MinGW\\lib\\gcc\\mingw32\\6.3.0\\include\\c++"
    ],
    "limitSymbolsToIncludedHeaders": true,
    "databaseFilename": ""
    }
}
Upvotes: 5
Related Questions
- Specify library path in Visual Studio Code?
- Visual Studio Code includePath subdirectories
- Elegant solution to VS code C/C++ include path for both intelliSense and building project
- Visual studio - how to include correctly
- How to setup "include path" in vscode to compile c++
- Including a full file path on VS Code
- Visual Studio Code: C++ include path
- Why isn't vscode's intellisense finding my included file?
- Visual Studio Code Intellisense and includePath
- What are the correct macOS vscode intellisense C++ include paths for the standard library?